Part IIa: Setup Windows Subsystem for Linux
This is Part IIa of a 3 1/2-part blog post on how I configured my working environment. Here I’ll explain how to configure Windows Subsystem for Linux (WSL).
- Part I: Setup Dev Environment in Windows
- Part IIa: Windows Subsystem for Linux (WSL)
- Part IIb: WSL & Docker setup
- Part III: Installation of additional packages and tools in WSL
Since Microsoft announced WSL, Windows 10 became a possible alternative to Linux and MacOS for software development. WSL combines the advantages of having a Linux Kernel backend (running Python, bash etc.) and a Windows graphical frontend, e.g. for working with Visual Studio Code.
WSL1 or WSL2?
Preparations
Enable Windows Features:
- WSL
- Virtual Machine Platform Windows (“VM Plattform)
- Hyper-V
Non-admin user?
Install a Linux distro with LxRunOffline
Setup of WSL is pretty straight forward if you use the Linux images available from the Microsoft Store. However, this is not always possible - e.g. if you’re running Windows 10 Education, the Microsoft Store may be disabled for reasons of security. With LxRunOffline, it is possible to set up WSL with any Linux image, and also chose where WSL default folder is located.
To install LxRunOffline, I prefer Chocolatey package manager. But you can also install lxrunoffline manually.
Open CMD with elevated privileges.
If you have choco, run the following to install LxRunOffline.
choco install lxrunoffline
2024-02-19 Note for outdated lxrunoffline on choco
Decide whether to use WSL1 or 2
See the section at the end of this page for instructions to switch between WSL1 and WSL2. By default, as of 2023, WSL2 will be used.
Install Linux Image
It is up to you what Linux distro to use. These days, it seems developers prefer Debian over Ubuntu, but both are valid choices.
- Download the latest Ubuntu Linux Image
*.tar.gzfrom canonical.com/core/ - Download the latest Debian Linux Image
*.tar.xzfrom docker.debian.net. These are the official Debian Images used in Docker. For example, this is the link to the latest bullseye image, go to the folder and downloadrootfs.tar.xz.
Below, I use the Debian Bullseye image.
Run the following command to install this image in WSL:
LxRunOffline i -n UF ^
    -d c:\WSL\UFDebian ^
    -f "c:\temp\rootfs.tar.xz" -s
.. where
-d c:\WSL\UFDebianis the path to the WSL Install. You can also set this to your second hard drive, to safe space onC, e.g.d:\WSL\UFDebian.-f c:\temp\rootfs.tar.xzis the path to the image you just downloaded.-smeans, create a Desktop Shortcut
By filling up the absolute path to the rootfs.tar.xz file,
the command will create a distribution named as UF, in directory c:\WSL\UFDebian
You can open the WSL Bash by creating a Shortcut, e.g. on your Desktop, with the following Target:
C:\tools\lxrunoffline\LxRunOffline.exe run -w -n "UF"
(the path may be different, depending on how you installed lxrunoffline)
Once you opened WSL bash, install base packages.
apt-get update \
    && apt-get install -y \
        lsb-release sudo nano git wget rsync \
    && apt-get clean all
.. and check your installation with: lsb_release -a.
It should output something along these lines:
> No LSB modules are available.
> Distributor ID: Debian
> Description:    Debian GNU/Linux 11 (bullseye)
> Release:        11
> Codename:       bullseye
Error: 0x800703fa Illegal operation attempted on a registry key that has been marked for deletion
If the following error occurs:
Error: 0x800703fa Illegal operation attempted on a registry key that has been marked for deletion
Restart lxssmanager (in Windows command prompt)
sc stop lxssmanager
sc start lxssmanager
Or in powershell:
Restart-Service LxssManager*
I also recommend adding a password to user root.
The password doesn’t have to be bullet proof, since you’re working in WSL inside Windows,
which provides the main security layer. I’d recommend using a simple, easy to remember
password that can be typed fast here. Set password with:
passwd root
Additional commands: lxrunoffline
To keep lxrunoffline up to date (in choco):
choco update lxrunoffline
To remove an existing WSL distro (e.g. named UF):
lxrunoffline uninstall -n UF
If, for any reason, a WSL distro got corrupt, it is possible to unlink (=remove)
it with the following command (e.g. named UF):
lxrunoffline unlink -n UF
If you later decide you want to move your WSL installation
(e.g. from C:/wsl/ to D:/wsl/) ^1
instructions:
lxrunoffline move -n UF -d d:\wsl\UF
To view additional information for a distro (such as the path it is installed to):
lxrunoffline sm -n UF
Add WSL to your right-click menu
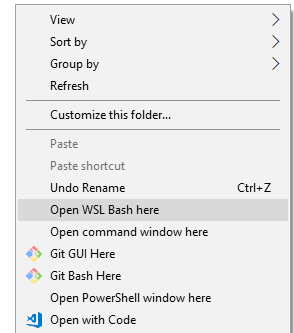
We want to be able to open WSL console from any folder location. To achieve this, we add WSL to the right click context menu with the following steps.
First, open the registry editor by pressing the Windows key, typing “regedit” into the Start menu, and pressing “Enter”.
Navigate to the following key:
HKEY_CLASSES_ROOT\Directory\Background\shell
- Right-click the “shell” key and select New > Key.
- Name the key “bash” or something similar. You can name it anything you want. This name doesn’t appear in Windows anywhere, and is just used to keep track of the entry in the registry.
- Select “bash” (or whatever you named the key) in the left pane.
- Double-click “(Default)” in the right pane and enter whatever name you want to appear in File Explorer’s context menu. For example, you could enter “Open WSL Bash here” or just “Bash”.
- Next, right-click the “bash” key and select New > Key.
- Name it “command”.
- With the “command” key selected in the left pane, double-click “(Default)” in
the right pane and enter the following value:
C:\Windows\System32\bash.exe
You are done. You can now right-click a folder in File Explorer and select “Open WSL Bash here” (or whatever you named the option) to quickly open a Bash shell to that specific folder. This option will appear immediately, so you don’t have to sign out or reboot first.
Create WSL default user
You don’t want to work with the root user by default.
Follow the steps below to create a new user account and give it sudo access. If you want to configure sudo for an existing user, skip to step 3.
Open your WSL-Bash
Create a new user account.
Create a new user account using the
addusercommand. Don’t forget to replace{your-username-here}with the user name that you want to create:export username={your-username-here} adduser $usernameYou will be prompted to set and confirm the new user password.
Similar to the root user, you can use a relatively weak password that is easy to remember.
Adding user `username' ...
Adding new group `username' (1001) ...
Adding new user `username' (1001) with group `username' ...
Creating home directory `/home/username' ...
Copying files from `/etc/skel' ...
New password:
Retype new password:
passwd: password updated successfully
Once you set the password the command will create a home directory for the user, copy several configuration files in the home directory and prompts you to set the new user’s information. If you want to leave all of this information blank just press
ENTERto accept the defaults.Changing the user information for username Enter the new value, or press ENTER for the default Full Name []: Room Number []: Work Phone []: Home Phone []: Other []: Is the information correct? [Y/n]Add the new user to the
sudogroupBy default on Ubuntu systems, members of the group
sudoare granted with sudo access. To add the user you created to the sudo group use the usermod command:usermod -aG sudo $username
Change default user for WSL
According to this issue, WSL sometimes starts with the wrong user account (e.g. you don’t want to use root by default). To correct this, first find out which user-id you need to provide (in WSL terminal):
id $username
will show something like this:
uid=1000(my-user-name) gid=1000(my-user-name) groups=1000(my-user-name),27(sudo)
Then use the given uid to update the default user (in Windows Command Line):
lxrunoffline su -n UF -v 1000
Fix WSL mount
By default, folders outside of WSL will have a /mnt/ in front of the actual path
(because external paths are mounted into Linux WSL).
This makes working with WSL a bit cumbersome, we can remove this /mnt/ with a WSL
configuration file.
Create and modify the new WSL configuration file:
sudo nano /etc/wsl.conf
- Now make it look like this and save the file when you’re done:
[automount]
root = /
options = "metadata"
Afterwards, in cmd, shutdown WSL with wsl --shutdown and reopen the WSL shell. You should see
your paths starting with the drive letters, without /mnt:
/c/User/...
Install & configure packages
This is rather open ended, but there are some packages that you may want to install and configure such as locales or configuration of time zone.
Locales:
sudo bash -c 'apt-get clean && apt-get update && apt-get install -y locales'
sudo dpkg-reconfigure --frontend readline locales
# when asked, select the number for en_US.UTF-8 (e.g. 158) and confirm
# when asked again, select the number for `en_US.UTF-8` as default locale
Time zone:
sudo dpkg-reconfigure tzdata
Keep WSL distro up to date
To upgrade your WSL installation and packages, use:
sudo apt-get update && sudo apt-get upgrade
Good things to know when working with WSL-Bash
- Never edit any files of the WSL distro with Windows
E.g. anything below C:\WSL\UFDebian is holy Linux territory that should never be touched
from Windows. Windows will mess with Linux file permissions, which is quite difficult to fix afterwards.
- Exit Shell Shortcut
Use Ctrl + D to exit the current shell.
- Add Command Shortcuts
The .bashrc file can be used to add aliases for commands.
The following instructions will add an alias update_wsl that will update WSL.
Open .bashrc in nano text editor:
nano ~/.bashrc
Add the following line at any position:
alias update_wsl="sudo bash -c 'apt-get update && apt-get upgrade && apt-get dist-upgrade && apt-get autoremove'"
Reload .bashrc file:
source ~/.bashrc
Use a different WSL terminal
The default Ubuntu Terminal is fine for most situations. If you like to optimize workflows, it can be tempting to check some of the other WSL Terminals available for WSL, such as MobaXTerm, ConEmu or Hyper.
I’ve changed to wsltty because this terminal is small, has a lot of nice features that help reduce daily work, and there are many nice themes available.
You can install wsltty with choco:
choco install wsltty
Some things you may want to do after installation:
- go to WSLtty entry folder in start menu and run
- “add default to context menu” (this will add the “open”-shortcut to right-click menu)
- “configure WSL shortcuts” (this should be automatically run with choco)
- on the upper left, click on the Linux icon:
- set “right click to paste”
- set “copy on select” (all selected text is copied)
- set “CTRL+SHIFT+ letter shortcuts” (allows you to use CTRL+SHIFT+V to paste)
- install theme, for example gruvbox.minttyrc
- open WSL, then go to this folder (replace AD with your username):
(Explorer:/c/Users/AD/AppData/Roaming/wsltty/themes/%AppData%/wsltty/themes/) - then:
wget https://raw.githubusercontent.com/morhetz/gruvbox-contrib/master/mintty/gruvbox.minttyrc - optional:
nano gruvbox.minttyrcand use38,38,38as BackgroundColor (slightly darker - nice tip from this guy) - now you can chose the theme under options
- additional settings for WSLtty:
- activate CTRL+Shift+letter shortcuts (lets you use e.g. CTRL+Shift+V for copy - note that any mouse selection is also always copied)
- Window size 180x24 (wider display)
- “no beep”
- “no scrollbar” (I can use CTRL+scroll for zoom/shrink)
- open WSL, then go to this folder (replace AD with your username):
Here’s how wsltty with the gruvbox.minttyrc theme looks:

Backup WSL distro
Use LxRunOffline, to back up (or restore) your WSL distro in/from a tar.gz file.
Optionally, clean up the tmp folder, before backing up:
sudo find /tmp -type f -atime +10 -delete
Optionally, purge unused old Linux Kernels:
sudo apt --purge autoremove
Then, shutdown WSL and store or load from .tar.gz.
wsl --list --all -v
wsl --shutdown
LxRunOffline.exe export -n UF -f c:/temp/UF.tar.gz
LxRunOffline.exe install -n UF2 -d D:/wsl/UF2 -f c:/temp/UF.tar.gz
Update from WSL 1 to WSL 2
You can upgrade distros from WSL1 to WSL2 (and vice versa). It is a good idea to make a backup before upgrading.
Use cmd for the following commands.
dism.exe /online ^
    /enable-feature ^
    /featurename:VirtualMachinePlatform ^
    /all /norestart
WSL 2 requires an update to its kernel component. For information please visit https://aka.ms/wsl2kernel For information on key differences with WSL 2 please visit https://aka.ms/wsl2
Convert existing WSL distros:
wsl --list --verbose
NAME STATE VERSION
- UF Running 1
wsl --set-version UF 2
Note: If you ever have trouble starting a specific distro through a shortcut, try opening it directly from within cmd:
wsl -d UF
Importing the distribution failed.
This may happen for various reasons. In my case, hard links used in ruby gems caused this failure.
After removing all gems, conversion did work.
gem cleanup --dryrun
gem cleanup
apt remove ruby
rm -rf /home/$USER/gems
See WSL/issues/4457.
Update default distro
If you have multiple WSL distros, set the default one to open with the command line or power shell:
wsl --list --all -v
> UF (Default)
> UF2
wsl --setdefault UF2
If using WSLtty, don’t forget to update your shortcuts and default context menu.
To remove a distro completely:
wsl --unregister <distro name>
Update WSL Kernel
This should be as simple as running:
wsl --update
Just that it isn’t, sometimes.
I would get (Windows Education with disabled App Store):
To install this application you need either a Windows developer license or a sideloading-enabled system.
These steps worked for me:
Download latest AppX WSL manually from WSL Releases
Use Admin PowerShell and run
Add-AppxPackage ./Microsoft.WSL_2.1.5.0_x64_ARM64.msixbundleThis failed, for the following reason as stated above.
Enable Developer mode. Use
Show-WindowsDeveloperLicenseRegistration(powerShell)The Button is grayed out
Open Policies
gpedit.mscGo to Computer Configuration > Administrative Templates > Windows Components > App Package Deployment.
- Click “Allows development of Windows Store apps.”
- Change to “Enabled”
Developer Mode should now be active
Run
Add-AppxPackage ./Microsoft.WSL_2.1.5.0_x64_ARM64.msixbundleIf it works, disable developer mode in policies afterwards.
Check the version afterwards (cmd):
wsl --version # (or wsl --status)
> WSL-Version: 2.1.5.0
> Kernelversion: 5.15.146.1-2
> WSLg-Version: 1.0.60
> MSRDC-Version: 1.2.5105
> Direct3D-Version: 1.611.1-81528511
> DXCore-Version: 10.0.25131.1002-220531-1700.rs-onecore-base2-hyp
> Windows-Version: 10.0.22631.3155
Upgrade Linux distro
This is not related to WSL. You can follow any of the official instructions to update (e.g.) from Bionic Beaver 18.04 to Focal Fossa 20.04.
Make a backup before you upgrade!
sudo apt update && sudo apt upgrade
sudo apt install update-manager-core
You may need to uninstall screen to get do-release-upgrade to work in WSL:
sudo apt-get remove screen
Edit release-upgrades
sudo nano /etc/update-manager/release-upgrades
And change:
prompt=lts
to:
prompt=normal
Restart, then:
sudo do-release-upgrade
sudo reboot
Validate afterwards:
lsb_release -a
After the upgrade, you may need to enable 3rd-Party repos.
cd /etc/apt/sources.list.d/
ls -l
Edit the files with nano to uncomment repos.
Afterwards, run:
sudo apt update
sudo apt upgrade
Maintenance
Use debian-security-support to audit installed packages against active security lifecycles and identify abandoned or limited-support components.
Run the following command to check if any installed packages have dropped out of regular security maintenance:
sudo apt update && sudo apt install debian-security-support -y
check-support-status
sudo apt purge libmfx1 # e.g. remove problematic packages that are not required in WSL
To keep the WSL instance minimal, clean, and free of untracked dependencies, run this cleanup sequence periodically:
sudo apt update && sudo apt upgrade -y
sudo apt autoremove --purge -y
check-support-status
List of WSL issues
Over the years, I have seen many different issues with WSL under different systems. This is a collection of issues and solutions.
1. WSL window closes immediately
There are several reasons why this can happen.
The first is to check for an outdated wsltty (see my comment above).
The next is to check whether you can login with wsl -d UF, where UF is the name of your WSL distro. Check with wsl --list -v.
If you can login this way, but your right-click menu does not work (WSL window closes immediately), check the following.
Go to:
%AppData%\Microsoft\Windows\Start Menu\Programs
Check if any of the Shortcuts to WSL work. If so, it might be that the “Default Shortcut” wsltty Script did not work properly.
This can be solved: Copy the path from a shortcut that does work. For example:
%LocalAppData%\wsltty\bin\mintty.exe --WSL="UF4" --configdir="%AppData%\wsltty" -~ -
Open registry editor, go to:
Computer\HKEY_CURRENT_USER\SOFTWARE\Classes\Directory\Background\shell\WSL_Terminal\command
… and manually update the command. The updated command will look slightly different from the one above:
"%LocalAppData%\wsltty\bin\mintty.exe" -i "%LocalAppData%\wsltty\wsl.ico" --WSL="UF4" --configdir="%AppData%\wsltty" -
2. Logon failure
On some rainy day, I suddenly saw this for my WSL2:
wsl -d UF
> Logon failure: the user has not been granted the requested logon type at this computer.
> Error code: Wsl/Service/CreateInstance/CreateVm/HCS/0x80070569
Solved with:
Get-Service vmcompute | Restart-Service
3. wsltty: Failed to run 'wsl': No such file or directory
After updating wsltty (to version 3.8.0 or newer), the terminal might open and
immediately show a red error message: Failed to run 'wsl': No such file or directory.
This happens because newer versions of wsltty changed the default method of launching
WSL. They now call wsl.exe directly, whereas older versions used a helper program
called wslbridge2. The error indicates that the mintty.exe process cannot find
or execute wsl.exe correctly.
This is an immediate workaround: You can force wsltty to revert to its older, reliable method of launching WSL.
- Navigate to your
wslttyconfiguration directory by pasting this path into Windows Explorer’s address bar:%APPDATA%\wsltty - Open the
configfile with a text editor. - Add the following line to the file and save it:
WSLbridge=2
This instructs wsltty to use the wslbridge2 helper program again, bypassing the issue with the direct wsl.exe call.