Part III: Additional package install in Windows Subsystem for Linux (WSL)
This is Part III of a 3-part blog post on how I configured my system. Here I’ll explain how to install additional packages in Windows Subsystem for Linux (WSL)
- Part I: Setup Dev Environment in Windows
- Part IIa: Windows Subsystem for Linux (WSL)
- Part IIb: WSL & Docker setup
- Part III: Installation of additional packages and tools in WSL
Miniconda3
Open WSL Bash (anywhere), then:
download Miniconda3 installer for Linux with
wget https://repo.continuum.io/miniconda/Miniconda3-latest-Linux-x86_64.shbash Miniconda3-latest-Linux-x86_64.sh“Do you wish the installer to initialize Miniconda3 by running conda init?” yes
afterwards:
conda update -n base conda -c defaultsoptionally, move the conda
envsdirectory to a persistent location
Create an env, e.g. for jupyter lab:
conda create -n jupyter_env
Add conda-forge only to specific envs, e.g.:
conda activate jupyter_envconda config --add channels conda-forge- Optionally add
conda config --set channel_priority strict
Install Jupyter Lab to jupyter_env
conda activate jupyter_envconda install -c conda-forge jupyterlab(conda-forge flag is not necessary if conda-forge has been added to default channels)
To update all packages in a specific env to latest possible versions:
conda activate jupyter_envconda update --all -c conda-forge
Test Jupyter Lab with commands:
conda activate jupyter_envjupyter lab
Visual Studio Code
To use Visual Studio Code in WSL and connect to it using Windows as a frontend.
Visual Studio Code Insiders is available in Choco, install with choco install vscode
After installation, open WSL bash in any folder and type code .
This will open the folder in Visual Studio Code and let VS Code connect to WSL.
Git
For git, the following instructions are taken from the official docs:
sudo apt update
sudo apt install git
Latest version of git? *Click*
If you want the latest “upstream” stable version from git for Ubuntu, use [1]:
sudo apt remove git
sudo add-apt-repository ppa:git-core/ppa
sudo apt-get update
sudo apt-get install git
You can confirm that you have installed Git correctly by running the following command:
git --version
Output
git version 2.17.1
Line endings fix:
Some pograms in Windows (such as Notepad) will convert LF line-endings to CRLF without notice, rendering those files unusable in Linux WSL.
The following command will tell git to always change (accidental) CRLF (Windows) line-endings to Unix Style LF line-endings. You can still use LF line-endings in Windows with programs like VS Code or Notepad++, which understand LF.
git config --global core.autocrlf input
File permissions fix:
When you look up this problem, people will usually recommend doing the following:
git config --global core.filemode false
Sadly, git init and git clone always set filemode to true, no matter what is set with git config --global. Therefore, you need to set this manually for each repository you’re working on with
git config --local core.filemode false
If you once forgot to set this, and you’re seeing a staged change in git with 644 -> 755, you can undo those changes by typing:
chmod -x file.xyz
There’s also the following command:
git update-index --chmod=-x file.xyz
.. or the alternative for newer git versions:
> `git add --chmod=-x` / `--chmod=+x`
Here’s an explanation:
The executable bit will not be detected (and therefore will not be set) for paths in a repository with
core.filemodeset to false, though the users may still wish to add files as executable for compatibility with other users who do havecore.filemodefunctionality.
For example, Windows users adding shell scripts may wish to add them as executable for compatibility with users on non-Windows.
Although this can be done with a plumbing command (
git update-index --add --chmod=+x foo), teaching thegit-addcommand allows users to set a file executable with a command that they’re already familiar with.
Git branch display
This tipp comes from Marc: it will display the current branch you’re on, if the folder is a git repo.
nano ~/.bashrc
Copy the following with paste (right-click) or CTRL+Shift+V, depending on your terminal:
# Git branch in prompt
# https://stackoverflow.com/a/35218509/1329744
parse_git_branch() {
    git branch 2> /dev/null | sed -e '/^[^*]/d' -e 's/- \(.*\)/ (\1)/'
}
# create the prompt if not root / else
    PS1="\t \u@\h \w\$(parse_git_branch) "
Symbolic links in Git for Windows: see
Git Aliases and further config settings
Follow the steps described here to further simplify git usage in WSL:
https://git-scm.com/book/en/v2/Git-Basics-Git-Aliases
Also, I like adding git rerere by default:
git config --global rerere.enabled true
This means that if any merge conflicts appear again, git will remember how they’re solved.
These are some other aliases, added to ~/.bashrc, that I frequently use. Have a look at this post.
gpg
I added a dedicated blog post for using git with GPG
SSH
When you’re using git, chances are high you’re also authenticating with SSH (e.g. to push/pull from and to a remote repository).
How SSH is supposed to be used:
- each physical device you’re authenticating from should have its own key-pair
- that means: it is recommended to not use private keys across several computers (e.g. home and work)
- if one of your physical devices got compromised, you can remove that computers public key from remote servers/ websites etc. as a means to disable the compromised private key
- commonly, only one key is needed for each device you use and this is used across all serves/targets; creating multiple key-pairs does not increase security
Generate a key-pair
You can generate SSH Key-pairs in Windows (with e.g. Puttygen) or in WSL.
Here I’ll describe the Windows route. Have a look at this post that describes how to create an ssh-key-pair in WSL/Linux.
If you create your ssh-key with Puttygen, there’s a pitfall because there are two ways to export the private id_rsa from Puttygen:
- The first option is using *Save private key- in puttygen
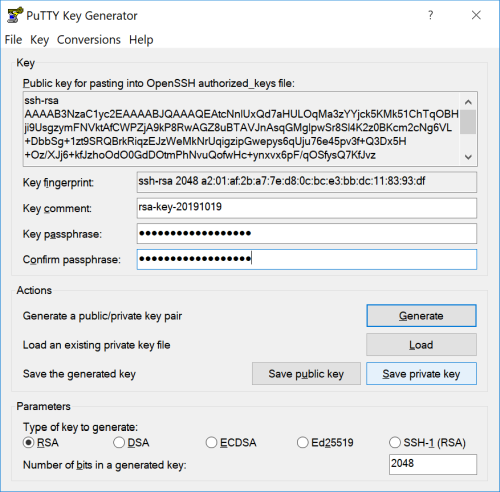
(Note: of course, this is a sample key generated, not any of my personal keys)
Keys exported this way can only be used in Windows, e.g. copy to %USERPROFILE%\.ssh\id_rsa.
If this key is saved to ~/.ssh/ in Linux (e.g. Windows Subsystem for Linux), it won’t work because of the wrong format.
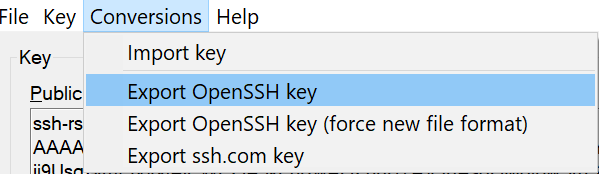
- The correct way is to export key for WSL/Linux from Windows Puttygen is from the menu *Conversions/Export OpenSSH key- in puttygen
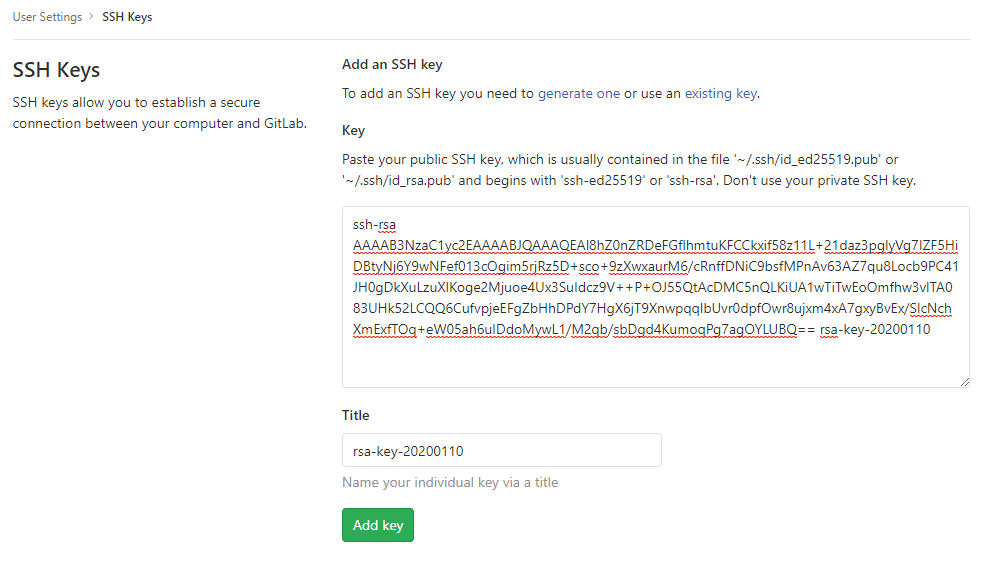
- Copy the public key (see image from puttygen, above, the field “Public key for pasting..”) to
e.g. Gitlab:
https://gitlab.vgiscience.de/profile/keys
e.g. an Ubuntu Server:
sudo adduser john
sudo mkdir /home/john/.ssh/
sudo bash -c 'echo "ssh-rsa AAAAB3NzaC1yc2EAAAABJQAAAQEAl8hZ0nZRDeFGflhmtuKFCCkxif58z11L+21daz3pglyVg7IZF5HiDBtyNj6Y9wNFef013cOgim5rjRz5D+sco+9zXwxaurM6/cRnffDNiC9bsfMPnAv63AZ7qu8Locb9PC41JH0gDkXuLzuXlKoge2Mjuoe4Ux3SuIdcz9V++P+OJ55QtAcDMC5nQLKiUA1wTiTwEoOmfhw3vlTA083UHk52LCQQ6CufvpjeEFgZbHhDPdY7HgX6jT9XnwpqqlbUvr0dpfOwr8ujxm4xA7gxyBvEx/SlcNchXmExfTOq+eW05ah6uIDdoMywL1/M2qb/sbDgd4KumoqPg7agOYLUBQ== rsa-key-20200110" >> /home/john/.ssh/authorized_keys'
SSH-Agent Setup Overview
You’ve generated your key-pair, but you haven’t setup an SSH Agent that manages your keys and is used for authentication.
You’ve several options:
- Use Linux SSH Agent in WSL
- easy to setup
- caveat: you can’t use the SSH Agent from WSL to authenticate in Windows (e.g. cmd/git-for-windows)
- Use Pageant in Windows 10:
- easy to setup (use choco)
- you can use Keepass and the KeeAgent Plugin to manage your ssh keys in windows
- caveat: you can’t use pageant-keys in your WSL without extra work
- Use Windows 10 OpenSSH Agent
- supported out of the box
- difficult to integrate with Keepass/KeeAgent
- Use wsl-ssh-pageant or other solutions to connect from WSL to your Windows SSH Agent
- convenient once it is setup properly
- there’s a list of steps that need to be taken
This is my current setup:
- Putty & Pageant installed with choco
- Keepass with KeeAgent plugin, KeeAgend in
AgentMode, adds SSH Keys to Putty - Pageant-Keys from Windows are made available to WSL through a socket (WSL1 & WSL2)
Basic SSH Setup in WSL
If you generated a private id_rsa with the above instructions, copy it to the linux ssh folder with:
cp /c/temp/id_rsa ~/.ssh/
If the file was generated in Windows, you also need to update permissions, e.g.:
cd ~/.ssh/
chmod 700 id_rsa
In case your .ssh folder doesn’t exist:
mkdir ~/.ssh/
Optional: auto ssh
Now, each time you authenticate, SSH will ask for the ssh key password. If you want to authenticate once for the whole session (that is: as long as you keep the WSL Window open), follow these steps:
nano ~/.bashrc
Add anywhere the following line:
alias autossh='eval `ssh-agent -s`;ssh-add'
Hit CTRL+O (save), then reload .bashrc:
source ~/.bashrc
When you open a WSL window now, simply type autossh.
It will ask you for a password. You will stay authenticated during the full WSL session.
Another tip: if you do this in a byobu session, you will stay authenticated even when shutting down your computer (this may or may not be a security risk).
Setup Windows ssh agent with Pageant
- install Putty with Choco
- optionally, install and setup Keepass and the KeeAgent Plugin to manage your keys with KeePass
Optionally unlock your ssh key on Windows Startup:
- Copy your private key (that is password protected) to
%USERPROFILE%\.ssh\id_rsa - Use ⊞ + R and run
shell:startupto open your startup folder - right-click / Add shortcut and name it “load_ssh_key”
- Target:
C:\ProgramData\chocolatey\lib\putty.portable\tools\PAGEANT.EXE "C:\Users\[User]\.ssh\id_rsa.ppk"- replace [User] by your username - you can get the full path from explorer by using
%USERPROFILE%\.sshand Shift + Right Click onid_raw.ppk(“Copy as Path”) - use the path to your pageant executable, example above shows path to PAGEANT.EXE if you installed putty with choco
- Start in:
C:\ProgramData\chocolatey\lib\putty.portable\tools
Keepass and KeeAgent
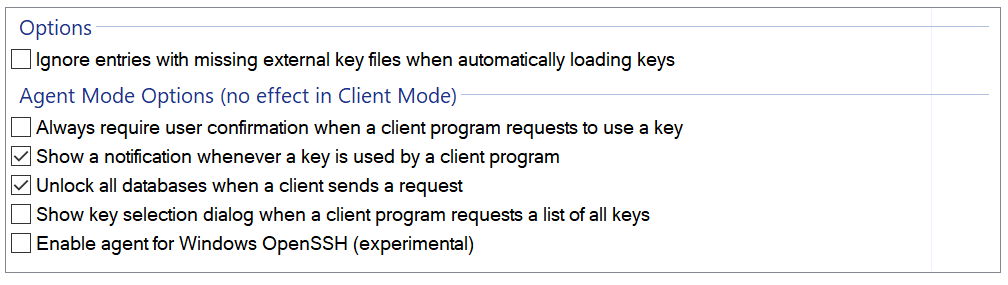
An alternative (or complementary) option is to use KeePass with the KeeAgent plugin.
Everytime you unlock your KeePass password store, selected keys are made available through KeeAgent in Pageant SSH Agent, there’s no need to enter the password for the key. This allows me to make keys available that I do not use as often (e.g. my Home SSH key, when I’m at work).
- install KeePass with choco
- install KeeAgent plugin
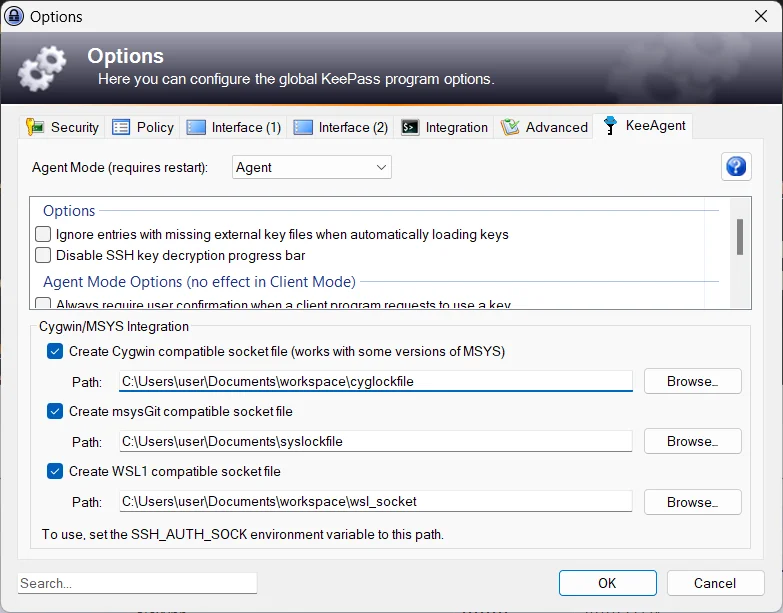
- in KeePass Options / KeeAgent Tab, add (replace
[User]with your user or use any other path):- Cygwin socket file
C:\Users\[User]\Documents\workspace\cyglockfile - Msysgit socket file
C:\Users\[User]\Documents\syslockfile - Check “Create WSL1 compatible Socket file”
- Cygwin socket file
- select the KeeAgent Mode
Agent
- in KeePass Options / KeeAgent Tab, add (replace
Screenshot:
I also set the following options for KeeAgent:
- Add your ssh-key to KeePass, enable KeeAgent availability for each key you want to make available on KeePass unlock
- it is a good practice to have only one or two keys made available, otherwise your login may fail due to too many login attempts
- Check which keys are unlocked in KeePass under Tools/KeeAgent
- you can also use this Window to manually remove/add keys from the SSH Agent
FAQ:
- Make sure that Windows OpenSSH is on the latest version. It is very infrequently updated using Windows updates. You can get the latest Windows OpenSSH from the Github releases page.
- Make sure that the
OpenSSH Authentication AgentService is disabled. Check with WIN-Key+R ->services.msc
2024: WSL2 & Windows SSH Agent
WSL2 kept me busy with SSH issues. After a few months of trying to fix these, I found a pretty nice solution for connecting from WSL2 to my SSH Agent in Windows (KeePass with KeeAgent).
This was described by zoredache on Github. It is based on the idea to connect to WSL2 via OpenSSH from the Windows side to symlink the Windows SSH authentication socket into WSL2.
- First, check that you can actually see your windows keys on windows. Use
cmd:
ssh-add.exe -L
> ssh-rsa ...
If not, install OpenSSH in Windows.
- Install OpenSSH Server in WSL2
sudo apt-get install openssh-server
- Change the port openssh is listening in WSL2
sudo nano /etc/ssh/sshd_config
Add:
Port 2222
sudo nano /etc/wsl.conf
Add:
[boot]
systemd=true
For completeness, my full wsl.conf looks like this:
[automount]
root = /
options = "metadata"

[network]
generateResolvConf = false

[boot]
systemd=true
- Shutdown WSL2
In CMD, use:
wsl.exe --shutdown -n WSL_UF2
..where WSL_UF2 must be replaced with your WSL name. Use >wsl --list -v to get a list of names.
- Add your public SSH key to WSL2
In order for Windows to connect to WSL2, you must add the public key part to WSL2 authorized_keys.
nano ~/.ssh/authorized_keys
Add:
ssh-ed25519 ...
- Test SSH connection from Windows to WSL2
In CMD:
cd C:\Windows\System32\OpenSSH
ssh.exe alex@localhost -p 2222
> Last login: Fri Aug  9 10:02:22 2024
> ...
..where alex must be replaced with your WSL2 username.
- Create a systemd service to update
SSH_AUTH_SOCKin WSL2
sudo nano /etc/systemd/system/ssh_agent.service
Add:
[Unit]
Description=SSH Agent
After=ssh.service
ConditionPathExists=/c/Windows/System32/OpenSSH/ssh.exe

[Service]
ExecStart=/c/Windows/System32/OpenSSH/ssh.exe \
    alex@localhost -p 2222 -A -t -t bash -c \
    ': ; ln -sf "$SSH_AUTH_SOCK" ~/.ssh/agent ; exec sleep 1d'
KillMode=process
Restart=on-failure
Type=simple

[Install]
WantedBy=multi-user.target
- Start the agent
sudo systemctl start ssh_agent
Check that it is active:
systemctl is-active ssh_agent
- Test to get SSH keys from WSL2
ssh-add -l
> 2048 SHA256: ...
- Update your
~/.bashrcto start the daemon automatically
if [ -L ~/.ssh/agent -a -z ${SSH_AUTH_SOCK+x} ]; then
    # wait a bit for systemd to start sshd and ssh_agent units.
    wait_tries=20
    until test $((wait_tries--)) -eq 0 -o -S ~/.ssh/agent ; do sleep 0.5; done
    unset wait_seconds
fi
# set our socket
export SSH_AUTH_SOCK=~/.ssh/agent
I still had problems that the ssh_agent service would not start automatically. I solved this by adding:
sudo systemctl start ssh_agent
before the above in ~/.bashrc.
To not always enter my sudo password, I updated visudo for an exception for user alex and the systemctl command.
sudo visudo
Add:
alex ALL=NOPASSWD: /bin/systemctl
.. and replace user alex with your username.
Finally I can skip WSL1 and move all my work to WSL2.
PHP & Composer
Instructions as per this guide. Watch out for version variables within the following instructions - all php versions must match - e.g. replace 7.2 with your version of choice.
Install Apache and PHP
For PHP development in WSL, we need to get a web server and PHP. We’re using *Apache- here, but feel free to install the web server of your preference.
sudo apt-get install php
sudo apt-get install php-dom # optional
Install Composer inside Ubuntu in WSL
Following the official instructions for downloading and installing Composer, copy and paste this command into the CLI:
php -r "copy('https://getcomposer.org/installer', 'composer-setup.php');"
php -r "if (hash_file('sha384', 'composer-setup.php') === 'a5c698ffe4b8e849a443b120cd5ba38043260d5c4023dbf93e1558871f1f07f58274fc6f4c93bcfd858c6bd0775cd8d1') { echo 'Installer verified'; } else { echo 'Installer corrupt'; unlink('composer-setup.php'); } echo PHP_EOL;"
php composer-setup.php
php -r "unlink('composer-setup.php');"
To make Composer easier to use, run the following command to move Composer into your global path:
sudo mv composer.phar /usr/local/bin/composer
Now you can run composer
Finally, to start a local webserver running php in the current dictionary, enter the following command:
php -S 127.0.0.1:8000
..and open http://127.0.0.1:8000/ in your browser of choice.
NVM, NPM and NodeJS
.. with JS, things can get confusing:
Nvm is a nodejs version manager. It let’s you easily install and switch between versions. It retains globally installed packages for each version.
Npm is a package manager. It let’s you install software (libraries, plugins, frameworks and applications). Typically this software is installed to build Node applications. Sometimes it isn’t.
That means, NPM and NodeJS can be installed with NVM.
And Yarn? Yarn and NPM are both package managers for JS - if you have NPM, you don’t need Yarn. In other words, these two commands are interchangeable:
# install local dependencies with yarn
yarn install .
# install local dependencies with npm
npm install .
However, sometimes packages are only available with yarn.lock - for those situations, you installing yarn and npm in parallel is possible.
Install NVM
Check newest release and download, following the instructions:
curl -o- https://raw.githubusercontent.com/nvm-sh/nvm/v0.40.1/install.sh | bash
export NVM_DIR="$([ -z "${XDG_CONFIG_HOME-}" ] && printf %s "${HOME}/.nvm" || printf %s "${XDG_CONFIG_HOME}/nvm")"
[ -s "$NVM_DIR/nvm.sh" ] && \. "$NVM_DIR/nvm.sh" # This loads nvm
- Check install with
nvm --version
Install Node and NPM
Install Node and NPM with NVM (see).
nvm install --lts node
nvm use node
Check with node --version
This will automatically install NPM, too.
With NVM, you can install multiple versions of node in parallel, e.g.:
nvm install 6.14.4 # or 10.10.0, 8.9.1, etc
nvm use 6.14.4
Using Node and NPM with NVM makes it much easier managing JS environments.
To use NPM packages globally, use prefix npx, e.g.:
npx markdown-toc -i markdown.md
Install yarn
We first install node with nvm and then use npm (which comes with node) to
install yarn.
nvm install node
npm install --global yarn
yarn --version
Then install dependencies of your project with:
yarn install
Install RVM, Ruby, Gem, Bundler
E.g., for locally testing running jekyll-reveal web presentations.
Similar to NVM, RVM is the Ruby Version Manager.
- First, follow the official instructions to install RVM in Linux
e.g.:
gpg --keyserver keyserver.ubuntu.com --recv-keys 409B6B1796C275462A1703113804BB82D39DC0E3 7D2BAF1CF37B13E2069D6956105BD0E739499BDB
curl -sSL https://get.rvm.io | bash -s stable --ruby
Afterwards, restart WSL and install ruby with RVM:
rvm install ruby-3.1.0
Ruby/RVM issues
Many issues with RVM and Ruby installation are related to minimal versions required by distros. For instance, Ubuntu 22.04 ships with OpenSSL 3.0.0, which limits the lower Ruby version to 3.1.0.
You can check this with:
curl -Lks 'https://git.io/rg-ssl' | ruby
If you see OpenSSL issues during installation, try explicitly
setting openssl dir during installation (update [user] below, watch
for the path output by the previous command):
rvm autolibs enable # activate
rvm install ruby-3.1.0 --with-openssl-dir=/home/[user]/.rvm/usr
Or follow this hint and install linuxbrew and then use:
/bin/bash -c "$(curl -fsSL https://raw.githubusercontent.com/Homebrew/install/HEAD/install.sh)"
rvm install ruby-3.1.0 --with-openssl-dir=$(brew --prefix openssl@3)
There is also a wider range of recommendations available from bundler.io.
Check if ruby is installed:
ruby --version
The recommended way is to install ruby in your home directory. Below, replace with your version:
rvm use 3.1.0 --default
The output should be similar to
Using /home/[user]/.rvm/gems/ruby-3.1.0
Update gems once:
gem update
gem update --system
Install bundler and jekyll:
gem install bundler jekyll
bundle update --bundler
For jekyll on ruby 3.09, I also had to manually install webrick:
bundle add webrick
Then prepare and run your presentation, e.g.:
bundle install
bundle exec jekyll serve -o
If your rvm install fills up after a while, use the following to cleanup:
[rvmsudo] rvm cleanup all
Troubleshooting
- If you see a message like
/usr/share/rvm/rubies/ruby-2.6.3/lib/ruby/2.6.0/rubygems/ext/builder.rb:76: warning: Insecure world writable dir /home/userxxx/.rvm/gems in PATH, mode 040777
Fix with:
sudo chmod go-w /usr/share/rvm/
- If you see a message like
/usr/share/rvm/rubies/ruby-2.6.3/lib/ruby/2.6.0/fileutils.rb:1656: warning: already initialized constant FileUtils::METHODS
run
uninstall fileutils
to fix it.
Hugo
For building static sites, I often use Hugo (in fact, this page is generated from markdown with Hugo).
To install Hugo in WSL (for local testing), get the latest release from Github Release page (check the version number):
wget https://github.com/gohugoio/hugo/releases/download/v0.131.0/hugo_extended_0.131.0_linux-amd64.deb
.. and install to user folder (/usr/local/bin/) with:
sudo apt-get install -f ./hugo_extended_0.131.0_linux-amd64.deb
Now build and serve your site locally with:
hugo serve
byobu
**byobu*- is a window manager and terminal multiplexer. I like to use it when I have long running sessions on remote computers, where I want to detach and continue letting scripts run.
- it allows opening multiple windows next to each other and
- running commands in background.
It can be installed with:
apt-get install byobu
Start it with byobu. Here’s a list with the most frequent shortcuts I use:
- F2 - Create a new window
- F3/F4 - Move focus among windows
- F6 - Detach session and then logout (byobu window keeps running, even if WSL is closed)
- Ctrl-F6 - Kill current Window in focus (window closed)
- F7 - Enter scrollback history
- F8 - Rename the current window
When you close WSL and reopen it later, type byobu and you’ll have all your Sessions still running.
To enable byobu automatically on startup:
byobu-enable
SSH-Agent forwarding:
It can be challenging to get SSH Agend forwarding (-A) to work with byobu (in case
you want to use ssh from within a byobu session).
This worked for me, slightly adapted for byobu:
- In
~/.ssh/rc, add
if test "$SSH_AUTH_SOCK"; then
	ln -sf $SSH_AUTH_SOCK ~/.ssh/ssh_auth_sock
fi
This will create a symlink from the auth socket to a fixed path, so that we can refer to it in the next step.
- In
~/.byobu/.tmux.conf, add
setenv -g SSH_AUTH_SOCK $HOME/.ssh/ssh_auth_sock
set -g update-environment -r
On attaching to a tmux session, this will set SSH_AUTH_SOCK to the path we just created.
Afterwards:
- reload
byobuwith F5 - logout and login again
- test with
ssh-add