Stable Diffusion on TUD HPC cluster
I described my first tests for map making with Stable Diffusion in a previous blog post.
The biggest challenge was getting GPU-resources. Google Colab locked down the use of Stable Diffusion for their free services and GPUs from Paperspace turned out to be mostly unavailable, due to high demand.
The TUD High Performance Cluster has GPU resources available for Machine & Deep Learning, but I often found software setup quite cumbersome because Docker containers cannot be used.
Here I’ll describe how I set up Stable Diffusion with the web-ui from automatic1111.
There were some interesting challenges, one of them was using a jump-host to forward the web-ui served in the HPC cluster to a local port.
1. Register HPC project
Let’s start with the prerequisites. First you will need to register a HPC project. There is a nice guide from Till Korten that describes the overall process. I only found this after setting up our HPC project.
The parameters I used
- Accelerator core-h on GPU-nodes
250 - Cores per GPU-job
1 - GB of memory per GPU-job
16 - Progr. scheme
CUDA - Work/Scratch:
- Files (in thousand)
1000 - Storage (in GB)
50
- Files (in thousand)
- Project:
- Files (in thousand)
50 - Storage (in GB)
100
- Files (in thousand)
- Number of files (in thousand)
300 - Amount of data (in GB)
20 - Amount of files and data written during typical jobs including temporary files
- Number of files (in thousand)
0.1 - Amount of data (in GB)
1
- Number of files (in thousand)
- Data transfer in total (in GB)
1
You get a project identifier, I will call this sd_project below.
2. Connect to taurus/alpha and setup dependencies
For the software setup, we already need CUDA to be available. I use srun to start
a longer running interactice job on the gpu2-partition.
gpu2 is slower than the alpha-partition, but we don’t need speed during setup.
The ./webui.sh will create a venv with the dependencies.
./webui.sh requires Python 3.10.6.
However, on taurus/alpha, only Python 3.7.3 is available.
Therefore, we need to make a detour to get Python 3.10.6 below.
cd ~/
module load Anaconda3
git clone https://github.com/AUTOMATIC1111/stable-diffusion-webui.git
cd stable-diffusion-webui
git checkout tags/v1.6.0
Replace the version number to any of the latest (non RC) releases. Check releases here.
Prepare Python 3.10.6.
Initially, I could not install 3.10.6 directly on taurus/alpha; only 3.10.4, and afterwards 3.10.6.
You can first try to install 3.10.6 directly:
conda create -n automatic1111_setup python=3.10.6 -c conda-forge
conda activate automatic1111_setup
If it fails, use:
conda create -n automatic1111_setup python=3.10
conda activate automatic1111_setup
conda install -c conda-forge python=3.10.6 # now 3.10.6 installation works
Now that we have a conda env, we don’t need the system conda env anymore.
Remove 3.9.2 Anaconda (taurus/alpha) Python from PATH.
module unload Anaconda3
Here, webui.sh still picked up wrong Python 3.7.3 for me. Override by editing webui-user.sh
and specifying a static full path to the correct Python version to use.
Check your python first with python --version and which python. Get the full path
to the python path, e.g.
which python
> ~/.conda/envs/automatic1111_setup/bin/python
readlink -f ~/.conda/envs/automatic1111_setup/bin/python
> /home/h5/s1111111/.conda/envs/automatic1111_setup/bin/python3.10
Copy this path and uncomment/add python_cmd variable in webui-user.sh.
nano webui-user.sh
> python_cmd=/home/h5/s1111111/.conda/envs/automatic1111_setup/bin/python3.10
Now, start webui.sh, it will prepare the venv and install the dependencies.
Check that the correct Python and webui versions are listed.
./webui.sh
> Python 3.10.6 (main, Oct  7 2022, 20:19:58) [GCC 11.2.0]
>Version: v1.6.0
You can recreate/start from scratch by moving or deleting the venv folder.
mv venv venv_bak
Lastly, you either need to change python_cmd path in webui-user.sh to
the venv python ("/home/h5/s1111111/stable-diffusion-webui/venv/bin/python"),
or source activate the venv before starting webui.sh (or both):
source venv/bin/activate
There are some remaining errors I got with 1.6.0, see below how to I fixed those.
Manual bugfixes
If you see an error:
ERROR: Cannot activate python venv, aborting…
fix with:
python3.10 -m venv venv
git
Here I had to fix modules/launch_utils.py:
- replace all
-Cwith--exec-path:git -Cis not available on taurus/alpha, due to an older version used. - there’s an issue report #8193 for this
An alternative is to install the latest git in our parent conda env (automatic1111_setup),
e.g. conda install git -c conda-forge
get_device
.. and I had to fix venv/lib/python3.10/site-packages/basicsr/utils/misc.py
cannot import name ‘get_device’
- Solution described in #193:
nano venv/lib/python3.10/site-packages/basicsr/utils/misc.py- Add to the top, below imports:
import torch
def get_device():
    if torch.cuda.is_available():
        return torch.device("cuda")
    else:
        return torch.device("cpu")

def gpu_is_available():
        return torch.cuda.is_available()
dctorch not found
Another error I saw in k-diffusion:
> from dctorch import functional as df
ModuleNotFoundError dctorch in k-diffusion/k_diffusion/layers.py
Likely due to 1.6.0 tag not yet including the dependency.
Fix with:
cd repositories/k-diffusion
git checkout c9fe758
unexpected keyword argument ‘socket_options’
This happened after the migration to barnard/alpha:
  File ".../.conda/envs/automatic1111_setup/lib/python3.10/site-packages/httpx/_client.py", line 1445, in _init_transport
    return AsyncHTTPTransport(
  File ".../.conda/envs/automatic1111_setup/lib/python3.10/site-packages/httpx/_transports/default.py", line 275, in __init__
    self._pool = httpcore.AsyncConnectionPool(
TypeError: AsyncConnectionPool.__init__() got an unexpected keyword argument 'socket_options'
Fix with:
source venv/bin/activate
pip3 install httpx==0.24.1
See #13236
Also, once I saw this error, I changed my python_cmd path in webui-user.sh to
"/home/h5/s1111111/stable-diffusion-webui/venv/bin/python", as described above.
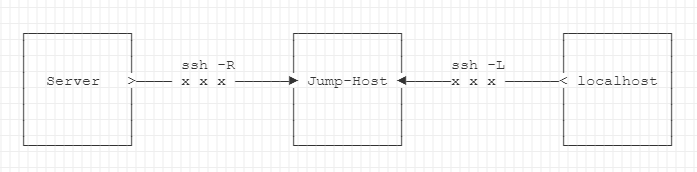
3. Use reverse tunnel to connect to interface
This was a neat problem I did not encounter before: The taurus/alpha login nodes and interactive jobs run in a cluster. Serving web apps from this cluster is difficult, even with a ssh reverse tunnel, since it is not possible to directly establish a reverse tunnel to a specific node. There is gradio to solve this, but I did not want to expose ZIH HPC resources to an external service. The solution was to use a jump-host - you can use any dedicated TUD Enterprise or Research Cloud VM for this.
Here is a graphic. See my explanation below.
First, start interactive gpu-session on alpha partition
For the actual gpu computation, I use the faster alpha partition with an 8-hour runtime job.
ssh -A s1111111@login1.alpha.hpc.tu-dresden.de
srun --account=sd_project \
    --gres=gpu:1 \
    --pty --ntasks=1 --cpus-per-task=2 \
    --time=8:00:00 --mem-per-cpu=16000 --pty bash -l
Second, from our HPC taurus/alpha session, establish a ssh tunnel with a -R option to a jump-VM with a distinct IP.
I use 141.11.11.1 as an example below - assume this is one of my research VMs. Replace ad with your username.
ssh ad@141.11.11.1 -o ExitOnForwardFailure=yes \
    -o ServerAliveInterval=120 -f -R \
    :7860:127.0.0.1:7860 -p 22 -N -v; \
    ./webui.sh
-Ndo not allow execution of commands on jump-host-fsend SSH tunnel to background./webui.sh- start stable-diffusion web-ui, serve to local port7860
Reverse tunnel to jump-VM from localhost with -L option
From your local computer, e.g. open Windows Subsystem for Linux (WSL), and establish a reverse-tunnel to the jump-host.
This will forward connection to the taurus/alpha-node, using the jump-host as a secure and private connection. Replace ad with your user name.
ssh ad@141.11.11.1 -L :7860:127.0.0.1:7860 -p 22 -N -v
Open http://127.0.0.1:7860/ in your local browser and start using the stable diffusion web-ui.
If you are finished, exit the web-ui with Q, Y, and CTRL-C. The background-ssh-tunnel should automatically close. If not, find the pid and kill it manually with:
ps -C ssh
> 13966 ?        00:00:00 ssh
kill 13966
Additional Setup: JupyterLab & API
If you want to connect from a JupyterLab instance to your Stable Diffusion environment, e.g. to use the API, the setup is quite similar.
Start webui.sh in API-mode
First, start the webui.sh with the flags --api and --nowebui. The latter is not necessary, according to the docs,
but on my side, no /sdapi/v1/ endpoints would be available otherwise with v1.6.0.
Secondly, change the listening port to 7861, which is where the API is available if --nowebui is used.
cd stable-diffusion-webui
export COMMANDLINE_ARGS="--xformers --api --nowebui"
ssh ad@141.11.11.1 -o ExitOnForwardFailure=yes \
    -o ServerAliveInterval=120 -f -R \
    :7861:127.0.0.1:7861 -p 22 -N; \
    ./webui.sh
Optionally, use a tunnel to forward to your local computer and check 127.0.0.1:7861/docs in your browser of choice.
ssh ad@141.11.11.1 -L :7861:127.0.0.1:7861 -p 22 -N -v
Jupyter Lab Host Mode
Assuming you want to query the API from a Jupyter Lab Notebook, such as in this example notebook 01_mapnik_generativeai.html, the setup is quite similar.
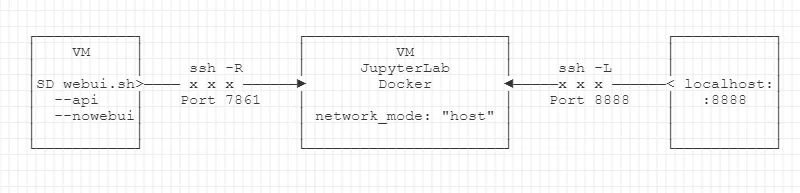
Summary of the tunneling context:
- Our stable-diffusion CUDA environment runs somewhere on the HPC.
- Your Jupyter Lab container runs either locally,
- or on another remote VM,
- likely inside Docker (e.g. if you use CartoLab Docker).
First, follow the instructions above to create a backward connection from the SD webui.sh port 7861 to the instance running Jupyter Lab.
To be able to forward connect to the port 7861 from within the Jupyter Lab Docker, we need to change the docker-compose.yml,
disable the custom network (e.g. from CartoLab Docker) and add network_mode: "host".
The docker-compose.yml may look like this afterwards.
version: '3.6'

services:

  jupyterlab:
    image: registry.gitlab.vgiscience.org/lbsn/tools/jupyterlab:${TAG:-latest}
    container_name: ${CONTAINER_NAME:-lbsn-jupyterlab}
    restart: "no"
    ports:
      - 127.0.0.1:${JUPYTER_WEBPORT:-8888}:8888
      - 127.0.0.1:${REDDIT_TOKEN_WEBPORT:-8063}:8063
    volumes:
      - ${JUPYTER_NOTEBOOKS:-~/notebooks}:/home/jovyan/work
      - ${CONDA_ENVS:-~/envs}:/envs
    environment:
      - READONLY_USER_PASSWORD=${READONLY_USER_PASSWORD:-eX4mP13p455w0Rd}
      - POSTGRES_PASSWORD=${POSTGRES_PASSWORD:-eX4mP13p455w0Rd}
      - JUPYTER_PASSWORD=${JUPYTER_PASSWORD:-eX4mP13p455w0Rd}
      - JUPYTER_WEBURL=${JUPYTER_WEBURL:-http://localhost:8888}
    network_mode: "host"
    # networks:
    #   - lbsn-network

# networks:
#   lbsn-network:
#     name: ${NETWORK_NAME:-lbsn-network}
#    external: true
Note the lines where I commented out the default values.
Afterwards, you can connect from your local PC to your JupyterLab instance that is served on port 8888 with:
ssh ad@141.11.11.1 -L :8888:127.0.0.1:8888 -p 22 -N -v