End of Life (EOL): Alternative SSH methods for Windows/WSL
A lot of things have changed with SSH options for Windows and WSL. Between 2019 and 2024, some of the options became deprecated or are not suggested anymore. For archive purposes, I added these outdated solutions below.
Go back to the up-to-date post.
SSH-Agent Setup
You’ve generated your key-pair, but you haven’t setup an SSH Agent that manages your keys and is used for authentication.
You’ve several options:
- Option A: Use Linux SSH Agent in WSL
- easy to setup
- caveat: you can’t use the SSH Agent from WSL to authenticate in Windows (e.g. cmd/git-for-windows)
- Option B: Use Pageant in Windows 10:
- easy to setup (use choco)
- you can use Keepass and the KeeAgent Plugin to manage your ssh keys in windows
- caveat: you can’t use pageant-keys in your WSL
- Option C: Use Windows 10 OpenSSH Agent
- same caveats as B
- Option D: Use wsl-ssh-pageant or other solutions to connect from WSL to your Windows SSH Agent
- convenient once it is setup properly
- there’s a list of steps that need to be taken
For a long time, I was happy with a combination of Option A and B. This required unlocking SSH Keys with the password each time I opened a new WSL Window. In windows, I had to unlock my KeePass Store and SSH Keys were available through KeeAgent (but I rarely use SSH in Windows these days).
I never used Option C (the native Windows 10 OpenSSH Agent) since I got used to Pageant and didn’t trust Microsoft to get the ssh-agent right the first time.
I recently discovered Option D, which I am using now because I only need to unlock my ssh-key once during my whole Windows Session.
This is my current setup:
- Putty & Pageant installed with choco
- there’s one private (password protected) keyfile for Git/Repo/Github in
C:\Users\[User]\.ssh, which will be unlocked on startup and is available for all authentications while the system is running - there’s an additional key that is made available through KeeAgent plugin for Keepass that I used to login to remote servers (increased security because I need to unlock Keepass first)
- Pageant-Keys from Windows are made available to WSL through wsl-ssh-pageant bridge
Option A: Setup WSL ssh agent
If you generated a private id_rsa with the above instructions, copy it to the linux ssh folder with:
cp /c/temp/id_rsa ~/.ssh/
If the file was generated in Windows, you also need to update permissions, e.g.:
cd ~/.ssh/
chmod 700 id_rsa
In case your .ssh folder doesn’t exist:
mkdir ~/.ssh/
Optional: auto ssh
Now, each time you authenticate, SSH will ask for the ssh key password. If you want to authenticate once for the whole session (that is: as long as you keep the WSL Window open), follow these steps:
nano ~/.bashrc
Add anywhere the following line:
alias autossh='eval `ssh-agent -s`;ssh-add'
Hit CTRL+O (save), then reload .bashrc:
source ~/.bashrc
When you open a WSL window now, simply type autossh.
It will ask you for a password. You will stay authenticated during the full WSL session.
Another tip: if you do this in a byobu session, you will stay authenticated even when shutting down your computer (this may or may not be a security risk).
Option B: Setup Windows ssh agent with Pageant
- install Putty with Choco
- optionally, install and setup Keepass and the KeeAgent Plugin to manage your keys with KeePass
Optionally unlock your ssh key on Windows Startup:
- Copy your private key (that is password protected) to
%USERPROFILE%\.ssh\id_rsa - Use ⊞ + R and run
shell:startupto open your startup folder - right-click / Add shortcut and name it “load_ssh_key”
- Target:
C:\ProgramData\chocolatey\lib\putty.portable\tools\PAGEANT.EXE "C:\Users\[User]\.ssh\id_rsa.ppk"- replace [User] by your username - you can get the full path from explorer by using
%USERPROFILE%\.sshand Shift + Right Click onid_raw.ppk(“Copy as Path”) - use the path to your pageant executable, example above shows path to PAGEANT.EXE if you installed putty with choco
- Start in:
C:\ProgramData\chocolatey\lib\putty.portable\tools
Keepass and KeeAgent
An alternative (or complementary) option is to use KeePass with the KeeAgent plugin.
Everytime you unlock your KeePass password store, selected keys are made available through KeeAgent in Pageant SSH Agent, there’s no need to enter the password for the key. This allows me to make keys available that I do not use as often (e.g. my Home SSH key, when I’m at work).
- install KeePass with choco
- install KeeAgent plugin
- in KeePass Options / KeeAgent Tab, add (replace
[User]with your user or use any other path):- Cygwin socket file
C:\Users\[User]\Documents\workspace\cyglockfile - Msysgit socket file
C:\Users\[User]\Documents\syslockfile
- Cygwin socket file
- if you are using pageant in Windows, select the KeeAgent Mode
Client, otherwiseAgent
- in KeePass Options / KeeAgent Tab, add (replace
I also set the following options for KeeAgent:
- Add your ssh-key to KeePass, enable KeeAgent availability for each key you want to make available on KeePass unlock
- it is a good practice to have only one or two keys made available, otherwise your login may fail due to too many login attempts
- Check which keys are unlocked in KeePass under Tools/KeeAgent
- you can also use this Window to manually remove/add keys form the SSH Agent
Option D: Use Windows SSH-Agent in WSL
Make sure you’ve followed B first if you want auto-unlock of your key on windows startup.
Prepare and test setup:
- open windows command line (shift + right click, e.g. in your windows documents folder)
- create folder
workspacewithmkdir workspace(e.g. in windows documents folder) - create another folder for the SSH_SOCK_FILE somewhere, e.g.
C:\wsl-ssh-pageant - Download the latest release of
- wsl-ssh-pageant-amd64.exe and
- wsl-ssh-pageant-amd64-gui.exe from wsl-ssh-pageant
- store these files in your
workspacefolder (e.g. in windows documents folder)
cd workspacein your cmd from above- run
wsl-ssh-pageant-amd64.exe ^ -force -systray -wsl C:\wsl-ssh-pageant\ssh-agent.sock ^ -winssh ssh-pageant -verbose - test your connection:
- in Windows cmd:
set SSH_AUTH_SOCK=\\.\pipe\ssh-pageantssh -vvvv -T john@111.11.11.1(use a server and username of your own)
- in WSL:
export SSH_AUTH_SOCK=/c/wsl-ssh-pageant/ssh-agent.sockssh-add -lshould now list your keys available in Windows Pageant
- in Windows cmd:
Make it automatically available in WSL:
In WSL, run nano ~/.bashrc and add export SSH_AUTH_SOCK=/c/wsl-ssh-pageant/ssh-agent.sock.
In Windows, go to your task scheduler (⊞ + R and run taskschd.msc)
In the folder Task Scheduler Library, on the right side, click Create Task..
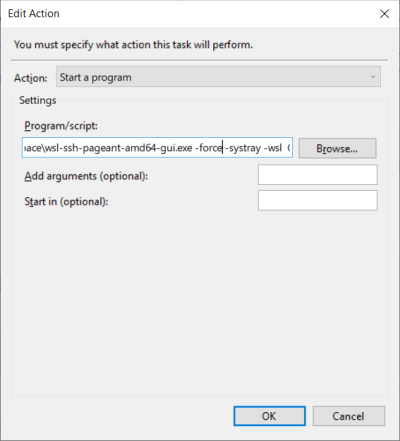
Go to Actions Tab and click New
Copy the full path to your wsl-ssh-pageant-amd64-gui.exe, including the arguments from above (without -verbose), e.g.:
C:\Users\[User]\Documents\workspace\wsl-ssh-pageant-amd64-gui.exe -force -systray -wsl C:\wsl-ssh-pageant\ssh-agent.sock -winssh ssh-pageant
We’re using the gui version because it’ll run in the background inside your task items.
- Optional: Add
/noshowto the field “Add arguments” if you don’t want the icon to be visible in your taskbar
Click OK, confirm with yes.
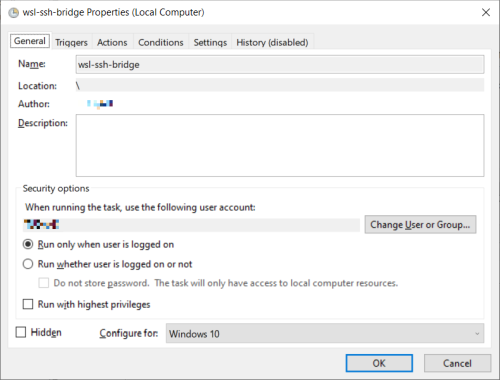
Under General, provide a name for the task such as wsl-ssh-bridge
Optional: check “Hidden” and “Windows 10” if you don’t want the task to be visible
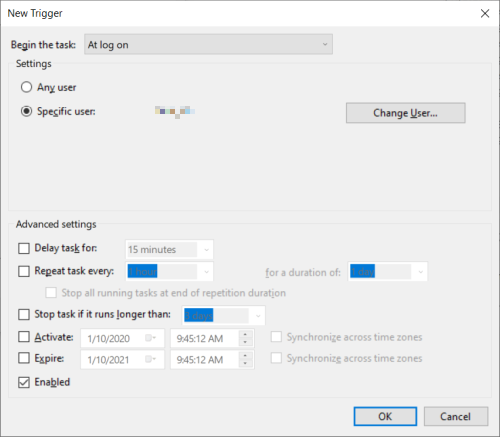
Under Triggers Click New.. and chose At log on (select your user).
Restart your computer or logout and login again.
After you’ve unlocked your key, open WSL session and test if your key is available with:
ssh-add -l
Optional: If you don’t want to start this task automatically, you can also add a shortcut to start the task with the target wsl-ssh-bridge (the name you’ve given your task):
C:\Windows\System32\schtasks.exe /run /tn "wsl-ssh-bridge"
.. and an alterative shortcut to stop the task:
C:\Windows\System32\schtasks.exe /end /tn "wsl-ssh-bridge"
Done!
Option D: Use Windows SSH-Agent in WSL2
The instructions below are based on rupor-github/wsl-ssh-agent and benpye/wsl-ssh-pageant/issues/33.
Install dependencies:
- make sure you have pageant installed on Windows and you have a key unlocked and added to pageant on Windows, e.g. see setup windows ssh agent with pageant
sudo apt update && sudo apt install socat p7zip-full
Get npiperelay.exe, store it on the Windows side and make it
available in Linux with correct permissions.
- replace
{username}with your Linux username (e.g.whoami) - replace
[USER]with your Windows username
cd /tmp
wget https://github.com/jstarks/npiperelay/releases/download/v0.1.0/npiperelay_windows_386.zip
7z e -y /tmp/npiperelay_windows_386.zip
sudo cp npiperelay.exe /c/Users/[USER]
sudo chmod +x /c/Users/[USER]/npiperelay.exe
sudo chown {username}:{username} /c/Users/[USER]/npiperelay.exe
Get wsl-ssh-agent-relay and store it correct permissions:
cd /tmp
wget https://raw.githubusercontent.com/rupor-github/wsl-ssh-agent/master/docs/wsl-ssh-agent-relay
sudo cp wsl-ssh-agent-relay ~/.local/bin/
sudo chmod +x ~/.local/bin/wsl-ssh-agent-relay
sudo chown {username}:{username} ~/.local/bin/wsl-ssh-agent-relay
Edit wsl-ssh-agent-relay and modify paths to npiperelay.exe and wsl-ssh-agent.sock:
nano ~/.local/bin/wsl-ssh-agent-relay
Edit:
- replace
[USER]with your Windows username
RELAY_BIN="/c/Users/[USER]/npiperelay.exe"
WSL_AGENT_SSH_SOCK="${HOME}/.ssh/wsl-ssh-agent.sock"
Prepare SSH directory:
mkdir -m 700 -p ~/.ssh
Update ~/.bashrc to auto-start relay and socat pipe:
nano ~/.bashrc
- replace
[USER]with your Windows username
${HOME}/.local/bin/wsl-ssh-agent-relay start
export SSH_AUTH_SOCK=${HOME}/.ssh/wsl-ssh-agent.sock
setsid nohup socat EXEC:"/c/Users/[USER]/npiperelay.exe //./pipe/\ssh-pageant" \
    UNIX-LISTEN:${SSH_AUTH_SOCK},unlink-close,unlink-early,fork \
    >/dev/null 2>&1 &
Reload ~/.bashrc bashrc:
source ~/.bashrc
Test:
ssh-add -l
> 2048 SHA256:
> ...